


Routing An OpenAPI Application With Node Express And Swagger
How to organize your OpenAPI files


Prologue
I recently learned about how to use swagger-cli to to create a node application and I was eager to try it with a new project. I was quickly confronted with some really tough issues and like the saying goes when you are confronted with an issue you either flee or fight. In my case I decided to not flee but fight it head-on.
Main Issue With The Package
The package that the swagger-cli builds the project with has a main issue of not being able to use the $ref for components that are defined outside of the yaml file, at least, that's the impression I get from the github discussions that spans so many years back without a true fix. This was because of it's dependence on some other packages and another and the story continues. For me, I was really bent on getting that simple functionality of not having to create and configure separate routers for my project. I really wanted to achieve that kind of communication between the OpenAPI file and the controller methods and for this simple interest I found out the swagger-routes-express npm package which seems to be like the backbone for this to be achieved.
In this tutorial I would show you other things I picked up and how I had to re-architect my project setup from my previous blog post on Integrating OpenAPI with Node . I would also share with you my opensource repo which comes with everything that will be discussed in this article already bootstrapped.
Prerequisites
You should have a working knowledge of
- Node
- Express
- OpenAPI with Swagger
Project Setup
First, let's install a few packages that are useful for this project.
- Nodemon for reloading our server when we make changes
- Swagger Parser a dependency that's required by swagger-routes-express
- Swagger UI Express for the Swagger UI functionalities
- Swagger Routes Express for handling routing
npm install nodemon swagger-parser swagger-routes-express swagger-ui-express
After the packages are successfully installed, we will go ahead to create 2 files in our root folder, app.js and server.js. This is just for separation of concerns. If you have just a single file serving as the entry point and for your express configs too that's also fine so long as you are able to follow along.
Inside the app.js file paste this code
const express = require('express');
const swaggerUi = require('swagger-ui-express');
const swaggerParser = require('swagger-parser')
const { connector } = require('swagger-routes-express');
const api = require('./api');

const makeApp = async () => {
  const parser = new swaggerParser();
  // this is the path to your OpenAPI file
  const apiDefinition = await parser.validate('./docs/openapi.yaml');
  const connect = connector(api, apiDefinition) // make the connector
  const app = express() // make the app
  // do any other app stuff, such as wire in passport, use cors etc

  // This is the endpoint that will display the swagger docs
  app.use('/api-docs',swaggerUi.serve, swaggerUi.setup(apiDefinition));

  connect(app); // attach the routes

  // add any error handlers last

  return app;
}
module.exports = makeApp;
Inside the server.js paste this code
const makeApp = require('./app');
const port = 3000;

makeApp()
  .then(app => {
    // use app to do other express related configs here
    app.listen(port)
  })
  .then(() => {
    console.log(`App running on port ${port}...`)
  })
  .catch(err => {
    console.error('Caught an error', err)
});
Optionally, we are creating a nodemon.json in the root of our project to hold the file extensions that should cause a restart of the server. This is because by default, nodemon would not watch for changes in .yaml files. Add this code to the nodemon.json file
{
  "ext": ".js, .mjs, .coffee, .litcoffee, .json, .yaml"
}
Organizing files
Another very important part of this project is how we organize our files. First, so that the routing will work as expected and second, so that when our app grows we can easily manage our API docs.
Inside the root of our application we are going to create 2 main folders, api and docs. It could be more but these 2 are mandatory for this tutorial. Inside the api folder, we will create a folder called controllers and an index.js file. The controllers folder will do as the name says, hold the controllers of our application. The purpose of the index.js file is to hold all the controller methods that will be exported from the various controller files that will be created. This is very important for the routing to work because we are importing const api = require('./api'); inside app.js which is is not pointing to any file in our folder. Node will look for an index.js and that's how come we are able to achieve that form of import in our Node apps. So anytime you want to import your own folders without specifying a file remember to add an index.js file in the root of that folder.
Back to where we left off. Now, inside our docs which will hold everything related to the API documentation, we will create the openapi.yaml file. We will then create these folders
- schemas
- responses
- paths
because we don't want to have one giant OpenAPI file which will be difficult to read when our project grows in the future.
OpenAPI setup
Now that we are done organizing our files, we go ahead to start working on our API documentation. Inside ./docs/openapi.yaml paste this code and adjust it to your needs
openapi: 3.0.0
info:
  description: Your API Description here
  version: 1.0.0
  title: API Docs Title
servers:
  - url: /api/v1

paths:
  /users:
    $ref: "./paths/users.yaml"
If you watch closely at the paths section we are referencing an external file so we obviously have to create the users.yaml file in our ./docs/paths and add this code below
get:
  summary: Returns a list of users.
  operationId: getAllUsers #This is the function that would be called from ./api/controllers/index.js
  description: Optional extended description in CommonMark or HTML
  tags:
    - User
  responses:
    '200':
      description: A JSON array of user names
      content:
        application/json:
          schema:
            $ref: "../schemas/user.yaml"
    default:
      $ref: "../responses/server-error.yaml"
There are couple of things that we can glean from this code. We will create a generic component that will be used to handle all our server errors. Inside the ./docs/responses/server-error.yaml we will add this code
description: An unexpected error was encountered
content:
  application/json:
    schema:
      $ref: "../schemas/error.yaml"
Now let's create all the schemas we are using inside our ./docs/schemas folder. Create user.yaml and paste this code
type: object
properties:
  username:
    type: string
  email:
    type: string
    format: email

required:
  - email
Create error.yaml and paste this code
type: object
properties:
  message:
    type: string
  code:
    type: string
Routing
The point with our routing here is that the value we specify for operationId in our paths should correspond to an actual controller function and actually execute the function should we hit that endpoint. We already have our folder structures already in place and setup done so all we have to do is just a couple of steps. Inside ./api/controllers/users-controller.js add your controller function as below
exports.getAllUsers = async (req, res, next) => {
  const usersList = [
    { username: 'Reuben', email: 'reuben@example.com' },
    { username: 'Frimpong', email: 'frimpong@example.com' },
  ];
  res.json(usersList);
}
A very key point to do here is inside ./api/index.js we would have import the controller functions and export them so that the swagger-routes-express can use them. Add this code
const { getAllUsers } = require('./controllers/users-controller');

module.exports = {
  getAllUsers,
}
Remember it's important that the name of the function matches the name that was specified in the operationId of the paths section of our OpenAPI doc.
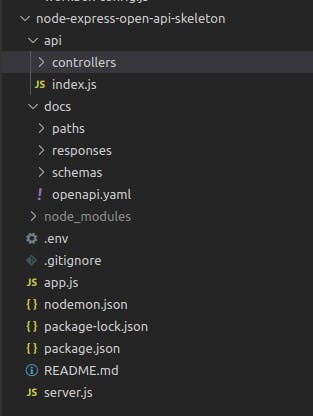
If you followed me step-by-step your folder structure should look something like this, ignoring the .env file
Running Our App
It is finally time for us to run our app. Inside your package.json file add this command to your scripts section
"start": "nodemon server.js",
Remember to save all the work you have done and run the server with
npm run start
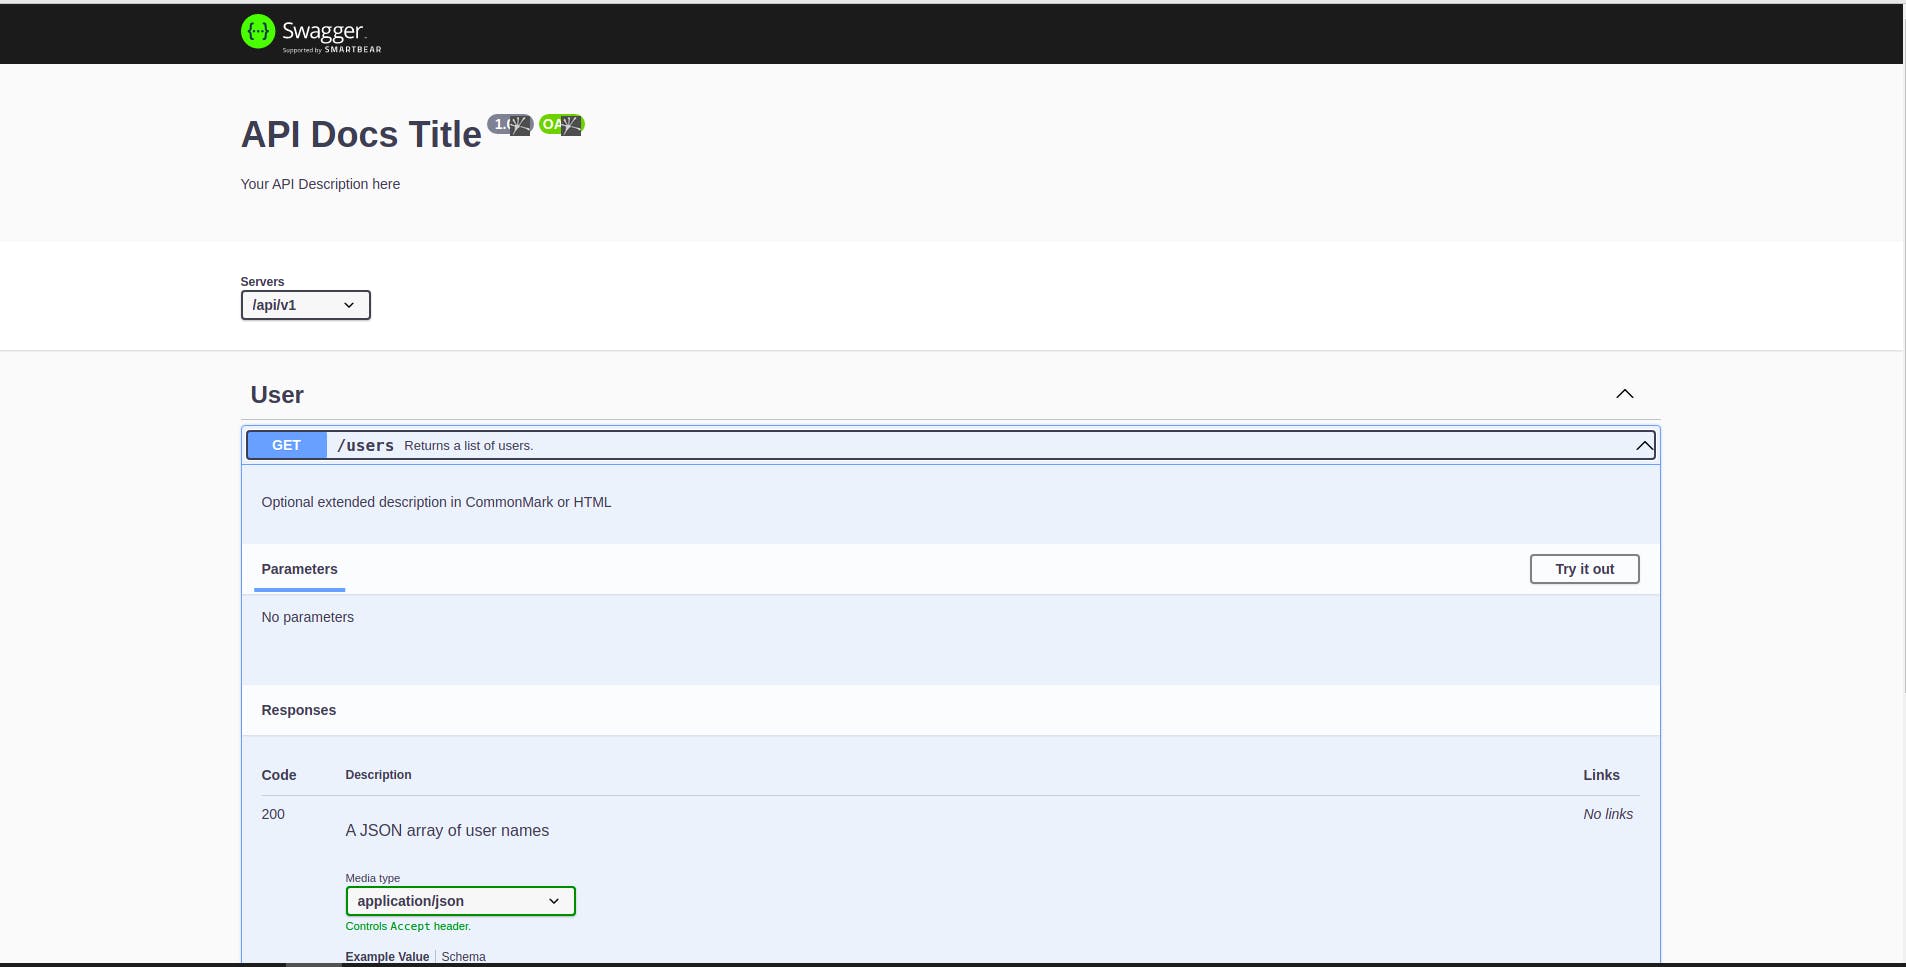
Inside your browser visit the url http://localhost:3000/api-docs to view your API documentation which would look like below
Next, we have to test our API to see if truly it works as we expect it. For that we would use Postman (we can also do this in the Swagger UI by clicking the Try It Out button). Inside our Postman we would create a new GET request to the http://localhost:3000/api/v1/users endpoint and it should return the some data from our controller like below
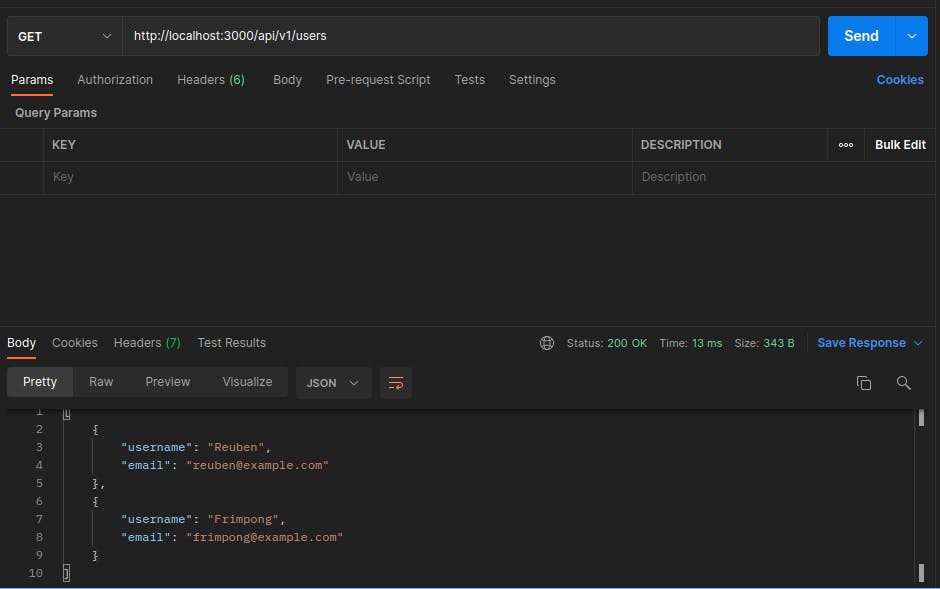
This is amazing as you can see. The routes are hitting the exact endpoint and behaves just like we want it.
Conclusion
I know this was a lot of steps to follow but you don't need to do all the steps. I have already created working skeleton on GitHub that you could just clone, modify and use. Find the repo here . Feel free to connect with me here on Hashnode, LinkedIn, and Twitter . I'm always happy to hear from you.